Deploy from GitHub with Automatic SSL
Ship your own Next.js, Node, Python, Docker or static app from a GitHub repository to a live HTTPS URL: connect the repo, pick a build pack, set the port and env vars, auto-deploy on push, add a custom domain and use pull request previews.
TheCodexApps Team
One-click apps cover a lot of ground, but sooner or later you want to run your code: a Next.js site, an Express API, a Django app, a Go service or a folder of static files. This guide walks through deploying from a GitHub repository on TheCodexApps, from a fresh repo to a live URL with a certificate that renews itself. We cover the three ways to connect a repository, how to pick a build pack, the two settings that cause most failed deploys (the listen address and the port), environment variables, auto-deploy on push, custom domains and pull request previews.
Everything below matches our Deploy from GitHub docs, including the limits and menu paths that decide whether a first deploy works.
- Prepare the app
- Connect the repo
- Pick a build pack
- Choose a package
- Push to deploy
- Live HTTPS URL
What you need before you start
You need three things: a GitHub repository with code that runs, a TheCodexApps account with a confirmed email address, and a paid package or plan. That last point is worth stating plainly. The free tier gives every verified account one one-click app on a free subdomain, and it is a good way to look around the panel, but GitHub deploys are not part of the free tier. Custom domains and managed databases are paid features too.
The two cheapest ways to run your own code are:
| Option | Resources | Launch price (first period) | Regular price |
|---|---|---|---|
| Git App Basic plan | 1 vCPU, 1 GB RAM, 10 GB disk | $3.50/month | $7/month |
| Package 1GB | 1 vCPU, 1 GB RAM, 15 GB disk, unlimited services | $3/month | $6/month |
| Package 2GB | 2 vCPU, 2 GB RAM, 30 GB disk, unlimited services | $5.50/month | $11/month |
A plan gives one service its own resources. A package is a pool you can fill with as many apps and databases as fit. The launch sale halves the first billing period of new plans and packages; renewals are charged at the regular price. See the pricing page and our post on choosing the right resource package.
Today all services run in our USA location, and each app gets a free HTTPS subdomain under us.thecodexapps.xyz.
Step 1: Make your app listen on 0.0.0.0 and a known port
Before you touch the panel, make one change in your code. Inside a container, localhost (127.0.0.1) means "this container only". If your server binds to it, the process starts, the logs look healthy, and every request from the outside world still fails. Your app must listen on 0.0.0.0 and on the port you will enter when ordering.
For a plain Node.js server with Express:
const express = require("express");
const app = express();

app.get("/health", (_req, res) => res.send("ok"));

const port = Number(process.env.PORT) || 3000;
app.listen(port, "0.0.0.0", () => console.log(`listening on ${port}`));
For Next.js, pass the host and port to next start in package.json:
{
  "scripts": {
    "build": "next build",
    "start": "next start -H 0.0.0.0 -p 3000"
  }
}
You set the port in the order form, and your app has to listen on exactly that port. Reading a PORT environment variable with a fallback, as in the Express example, is a good habit, but do not assume one is injected for you: the port in the form and the port your process opens must match. A cheap /health route gives you something to curl after every deploy.
Step 2: Connect your repository
TheCodexApps can read a repository in three ways. Choose Deploy from GitHub when ordering, then pick the source that fits.
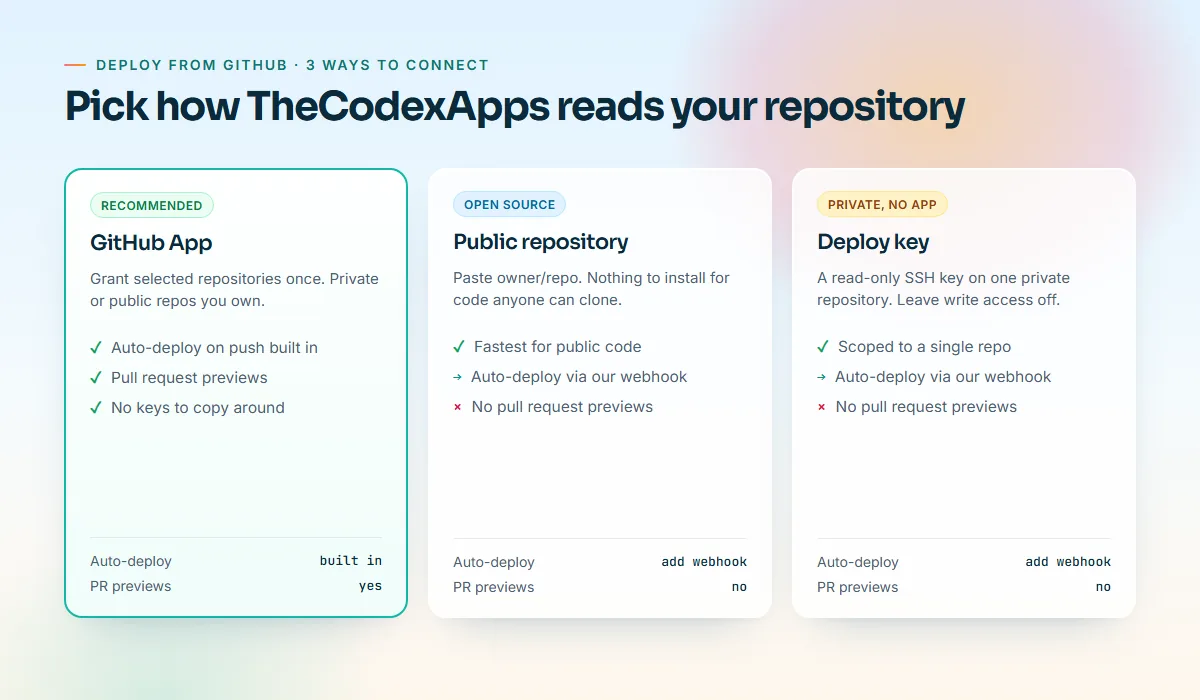
| Source | Use it when | Auto-deploy on push | Pull request previews |
|---|---|---|---|
| GitHub App (recommended) | Private or public repos you own | Built in | Yes |
| Public repository | Open-source code | Add our webhook | No |
| Deploy key | A private repo, without installing the app | Add our webhook | No |
The GitHub App (recommended)
Go to GitHub → Connect GitHub in the panel, pick the repositories to grant and approve. They then appear in the order form. Granting only the repositories you deploy is the least-privilege choice. Pushes deploy automatically, and pull request previews only work with this source.
A public repository
If the code is public, paste owner/repo and choose a branch. Auto-deploy needs a webhook, which we set up in Step 6.
A deploy key
A deploy key is an SSH key attached to one repository, for a private repo when you would rather not install a GitHub App. Create the key under GitHub → Deploy keys in the panel, then add the public key in your repository under Settings → Deploy keys on GitHub. Leave "Allow write access" off: we only ever need to read your code, and a read-only key cannot push to your repository even if it leaked.
Step 3: Pick a build pack
The build pack decides how your repository becomes a running container. There are four.
| Build pack | What it does | Best for |
|---|---|---|
| Nixpacks | Detects the language and builds automatically | Node, Python, Go, PHP, Ruby and similar apps with standard project files |
| Dockerfile | Builds the Dockerfile at the repository root |
Full control over the image, unusual system packages, multi-stage builds |
| Docker Compose | Runs a docker-compose.yml |
Several containers that belong together |
| Static | Serves built files | Static sites and single-page apps (set the publish directory in your build) |
Nixpacks reads your project files — package.json and a lockfile, requirements.txt, go.mod — and works out install, build and start commands, so a conventional project needs no build configuration. What it cannot guess is the port and the listen address, which is why Step 1 comes first.
Choose Dockerfile when you need a specific base image, system libraries or a slimmer image. The file must sit at the repository root. A good starting point from our Dockerfile tips:
FROM node:22-alpine AS build
WORKDIR /app
COPY package*.json ./
RUN npm ci
COPY . .
RUN npm run build

FROM node:22-alpine
WORKDIR /app
ENV NODE_ENV=production
COPY --from=build /app ./
EXPOSE 3000
CMD ["npm", "start"]
Pin base images (node:22-alpine, not node:latest), keep secrets out of the image, and log to stdout so the panel's runtime logs show what your app does. For sites that compile to plain files (Astro, Vite, Hugo), the Static build pack serves the output; set the publish directory your build writes to, such as dist.
Step 4: Choose a package or plan and deploy
In the order form, pick your repository and branch, the build pack and the port, then choose where the app runs: into a package you already have, or on its own plan. Package deploys are free inside the package as long as the remaining CPU, RAM and disk pool covers the allocation you choose; plan orders create an invoice.
Invoices are paid with crypto on our payment page or from your wallet balance, and setup starts once the payment is confirmed. The first build then starts, and we email you when the service is ready.
Size memory honestly: your plan's RAM is a hard limit, and a process that goes over it is restarted. Large Next.js or TypeScript builds can need more memory than the running app.
Step 5: Set environment variables, then redeploy
Configuration and secrets belong in environment variables, not in your repository. Open the service → Env vars and add what your app needs: DATABASE_URL, API keys, NODE_ENV, feature flags. Three rules from the environment variables docs matter here:
- Values are write-only. Once saved, a value is never shown again, so keep your own copy in a password manager.
- Saving an existing key replaces its value. There is no merge or history.
- Changes apply after a redeploy for GitHub apps. Saving a variable does not restart anything by itself.
Variable names may contain letters, digits and underscores and must not start with a digit.
Need a database? Create a managed PostgreSQL, MySQL, MariaDB, MongoDB, Redis or ClickHouse instance and put its connection string in a variable; see databases and managed Postgres vs self-hosting. Watch for build-time variables: Next.js inlines NEXT_PUBLIC_* values during next build, so changing one needs a rebuild — which a redeploy does.
Step 6: Turn on auto-deploy and read the build log
With the GitHub App, auto-deploy is already on: every push to the configured branch starts a deployment. For a public repository or a deploy key, add our webhook once:
- Open the service → Settings and copy the webhook URL and secret.
- In your GitHub repository, go to Settings → Webhooks → Add webhook.
- Paste the URL and secret, set the content type to
application/json, and choose Just the push event.
From then on, pushes to the configured branch start a deployment.
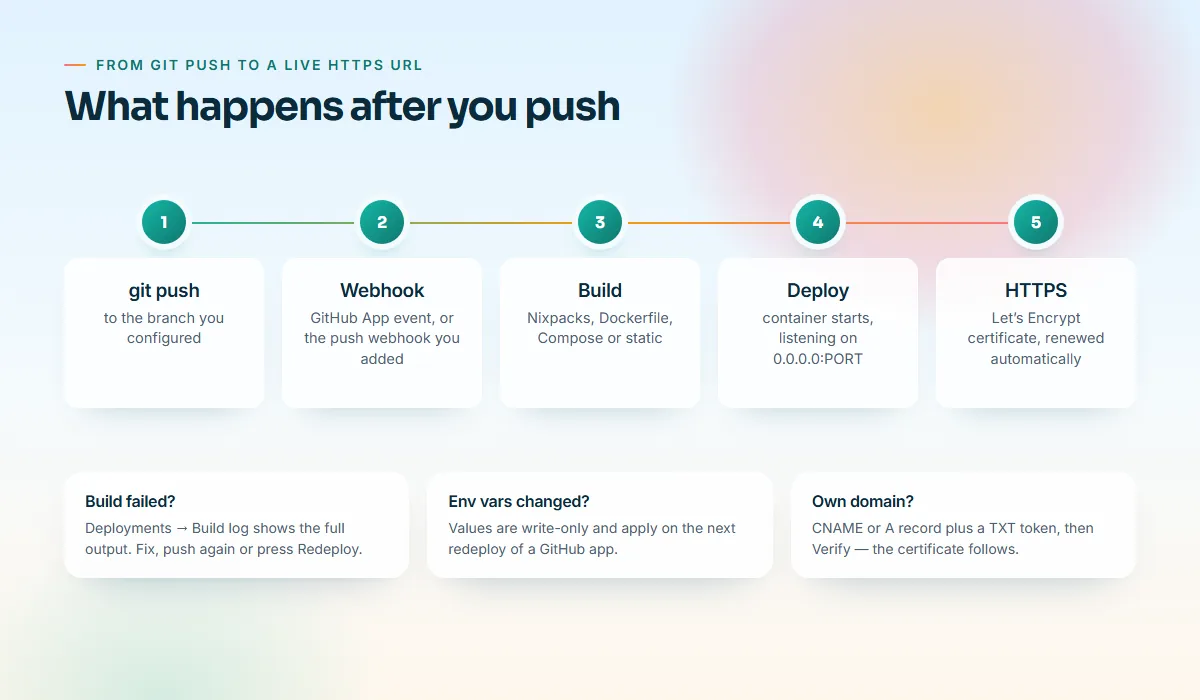
A typical loop looks like this: push, wait for the build, check the URL.
git add . && git commit -m "Add health route"
git push origin main
To github.com:acme/web.git
3f2c1a9..8d41e07 main -> main
curl -I https://web-a1b2c3.us.thecodexapps.xyz/health
HTTP/2 200
content-type: text/html; charset=utf-8When a deployment fails, open Deployments → Build log for the full output. Fix the problem and push again, or press Redeploy to rebuild (useful after changing variables). We support the platform itself; bugs in your own code are outside our support scope, though we are happy to point you in the right direction.
Step 7: Add a custom domain with automatic SSL
Your app already has HTTPS on its free subdomain. To serve it from your own domain, open the service → Domains → Add a custom domain, then create two DNS records at your DNS provider:
- Point the domain at us. For a subdomain, add a
CNAMEfromapp.example.comto your default subdomain. For a root domain, add anArecord forexample.compointing at the server IP shown in the panel. - Prove you own it. Add the
TXTrecord with the name and token shown in the panel.
Press Verify. DNS changes can take a few minutes to propagate. Once the domain verifies, it is attached and an HTTPS certificate is issued automatically. If you use Cloudflare, keep the record DNS only (grey cloud) at least until the certificate is issued, because the proxy hides the origin from the certificate check.
Certificates come free from Let's Encrypt. They are valid for 90 days and renewed automatically — no certbot, no calendar reminders. We also re-check verified domains every six hours and email you if one stops pointing at your service. Details are in the custom domains docs. You can check the records before pressing Verify:
dig +short CNAME app.example.com
dig +short TXT _thecodexapps-verify.app.example.com
Pull request previews
Apps connected through the GitHub App can get a temporary, running preview for every pull request.
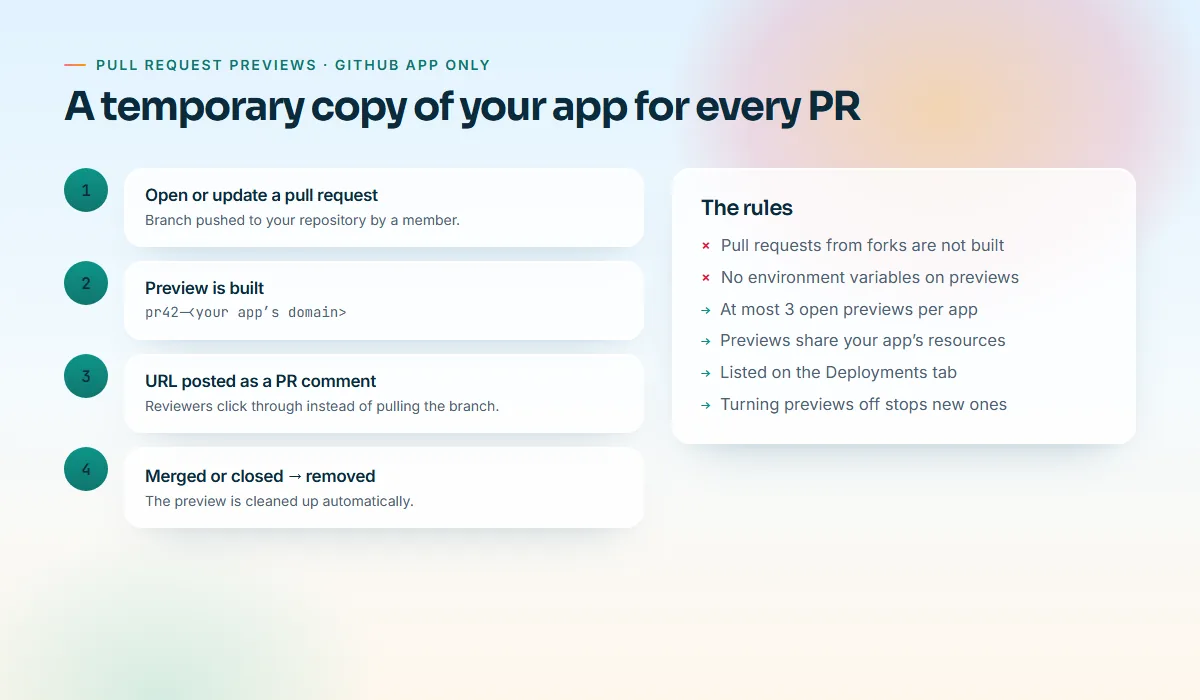
Turn them on under the app → Deployments → Pull request previews → Turn previews on. Then open or update a pull request: a preview is built at pr<number>-<your app's domain> and its URL is posted as a comment on the pull request. When the pull request is closed or merged, the preview is removed.
- Forks are not built — only branches pushed to your repository by its members.
- No environment variables, so production secrets never reach pull request code. Apps that need variables to start should fall back to safe defaults.
- At most three open previews per app; new ones pause until a pull request closes.
- Shared resources: previews use the same resources as your app.
Open previews are listed on the Deployments tab; turning previews off stops new ones.
Add a "Deploy to TheCodexApps" button
If you maintain an open-source project, a deploy button in your README lets anyone run their own copy. Make one on the Deploy button page: paste owner/repo and optionally a branch, then copy the markdown or HTML. The markdown looks like this:
[](https://thecodexapps.com/deploy?repo=owner/repo&branch=main)
Only public github.com repositories are accepted, and main is used when the branch is missing. Visitors sign up or log in, land on the order form with the repository filled in, and nothing is ordered until they pick a plan or package and confirm.
Deploy from GitHub with an AI agent
Our MCP server exposes the same flow to AI assistants. With the deploy scope, deploy_from_github deploys a repository into a package or onto a plan; without confirm: true it only returns a preview with price and blockers, and an idempotency_key makes retries safe. get_deploy_logs, set_env_vars and redeploy_service (write scope) cover the rest of the loop. See letting AI agents deploy your apps for setup and spending caps.
Common build failures and how to fix them
Most failed first deploys come from the same short list. Check these before anything else.
| Symptom | Likely cause | Fix |
|---|---|---|
| Build succeeds, URL never responds | App listens on localhost/127.0.0.1 |
Bind to 0.0.0.0 |
| Build succeeds, URL returns a gateway error | Port in the form does not match the app | Make the app listen on the port you entered |
| Install step fails or picks the wrong versions | Missing or stale lockfile | Commit package-lock.json, pnpm-lock.yaml or equivalent |
| "Missing script" during the build | No build or start script |
Add them to package.json |
| Build stops without a clear error | Out of memory during the build | Trim the build, or give the app more RAM |
| App crashes on start with an undefined variable | Env var missing, or needed at build time | Set it, then redeploy |
| "Dockerfile not found" | Dockerfile is not at the repository root | Move it to the root, or switch to Nixpacks |
| Clone fails on submodules | Private submodules the source cannot read | Vendor the code, or make the submodule reachable |
If a 1 GB plan runs out of memory while building, trim dependencies or move to a 2 GB package. For anything else, read the build log from the bottom up: the last error is usually the real one.
Key takeaways
- Make your app listen on
0.0.0.0and the port you enter in the order form — that alone prevents most failed deploys. - Use the GitHub App if you can: auto-deploy is built in and it is the only source with pull request previews. Deploy keys should stay read-only.
- Nixpacks handles standard Node, Python, Go, PHP and Ruby projects with no config; pick Dockerfile (at the repo root) when you need control.
- Environment variables are write-only and apply on the next redeploy.
- Custom domains need a CNAME or A record plus a TXT token; certificates are issued and renewed automatically.
- GitHub deploys need a paid package or plan: Package 1GB from $3 or Git App Basic from $3.50 for the first period.
Frequently asked questions
Can I deploy from GitHub on the free tier?
No. The free tier includes one one-click app on a free subdomain. Deploying your own code from GitHub, custom domains and managed databases need a paid package or plan. The cheapest options are Package 1GB ($3 for the first period during the launch sale, then $6 a month) and the Git App Basic plan ($3.50, then $7).
Do I have to install the GitHub App?
No. You can deploy a public repository by name, or a private one with a read-only deploy key. The GitHub App is recommended because auto-deploy on push is built in and it is the only way to get pull request previews; the other two sources need a push webhook for auto-deploy.
Which languages and frameworks are supported?
Anything that runs in a container. Nixpacks detects Node, Python, Go, PHP, Ruby and more automatically, a Dockerfile at the repository root covers everything else, Docker Compose runs multi-container setups, and the Static build pack serves built sites. The only hard requirements are listening on 0.0.0.0 and the port you configure.
How does SSL work on my own domain?
After you add the domain, create a CNAME or A record and the TXT verification record shown in the panel, then press Verify. Once DNS checks out, a free Let's Encrypt certificate is issued and renewed automatically. If you use Cloudflare, keep the record DNS only until the certificate is issued.
Why does my preview not have my environment variables?
On purpose. Pull request previews run without your environment variables so production secrets never reach pull request code. Make your app start with safe defaults when variables are missing, for example by disabling features that need a secret.
Can an AI assistant deploy my repository?
Yes. Connect Claude, Cursor, VS Code or another MCP client to our MCP server with the deploy scope, and ask it to deploy a repository. The deploy_from_github tool previews price and blockers first and only orders with confirm: true.
Ship your first repository
Want to look around first? Sign up and claim the free one-click app. When you are ready for your own code, pick Package 1GB or Git App Basic at the launch price on the pricing page and follow the steps above; the getting started guide covers the rest. Still comparing platforms? Read our honest look at Heroku alternatives for indie developers.