Deploy WordPress with Free SSL in Minutes
A step-by-step guide to one-click WordPress hosting with MySQL: honest sizing, the install wizard, automatic Let's Encrypt SSL on your subdomain and custom domain, HTTPS site URLs, hardening and backups.
TheCodexApps Team
WordPress is still the fastest way to get a real website online: a blog, a portfolio, a small business site or a documentation hub that non-developers can edit. What slows people down is rarely WordPress itself. It is everything around it: a server to patch, a database to configure, a certificate to issue and renew, DNS records to get right and a backup plan nobody writes down until it is too late.
This guide walks through deploying WordPress with MySQL on TheCodexApps from the one-click catalog, getting HTTPS working on a free subdomain within minutes, attaching your own domain with a free Let's Encrypt certificate, and then doing the unglamorous work that keeps a site healthy: HTTPS site URLs, hardening, backups and knowing when to add memory. We will be honest about sizing along the way, because the cheapest option is not always the one that works.
- Sign up and verify email
- Pick a package in the USA
- Deploy WordPress + MySQL
- Run the installer
- Attach your domain
- Live on HTTPS
What WordPress actually needs
Before choosing a plan, it helps to know what you are running. A WordPress site is two moving parts: a PHP application (WordPress core, your theme and plugins) served by a web server, and a MySQL or MariaDB database that stores posts, pages, settings, users and most plugin data. Uploaded media lives on disk in wp-content/uploads.
The official WordPress requirements page (checked 21 November 2026) recommends that your host supports:
- PHP version 8.3 or greater
- MySQL version 8.4 or greater, or MariaDB version 10.11 or greater
- HTTPS support
WordPress also still runs on older PHP and MySQL versions, but the same page notes those have reached their official end of life, so there is no reason to start a new site on them. The one-click template on TheCodexApps runs WordPress in a container with its own MySQL database next to it, so you do not install PHP extensions or create database users by hand. HTTPS is handled by the platform, which we cover in detail below.
Why memory matters more than CPU
For a small site, memory is the bottleneck, not CPU. PHP workers hold RAM while they render pages and MySQL wants buffers of its own. Squeeze both into a tight box and you get slow admin screens, failed plugin updates and database restarts when the container hits its memory limit.
Sizing honestly: the free app vs a paid package
TheCodexApps has a free tier: one one-click app per account with 0.25 vCPU, 256 MB of RAM and 1 GB of disk, on a free subdomain. It is genuinely useful for trying the platform with a tiny tool. It is not a good home for WordPress with MySQL. Two processes sharing 256 MB leaves almost nothing for PHP workers and database buffers, and the free tier does not include custom domains. That is why the WordPress template's minimum plan is App Starter (1 vCPU, 1 GB RAM), not the free app.
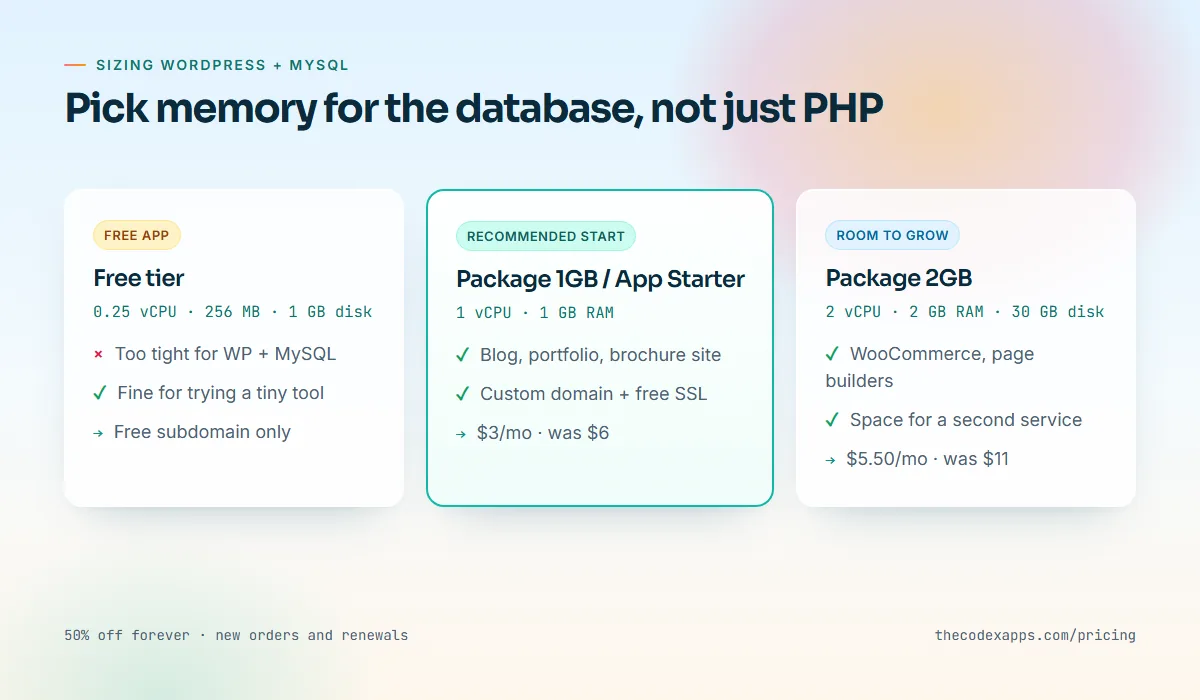
Here is how the realistic options compare. Prices are the regular monthly price and the first-period launch sale price (the sale applies to the first billing period; renewals are at the regular price). Full details are on the pricing page.
| Option | Resources | Monthly price | Good for |
|---|---|---|---|
| Free app | 0.25 vCPU, 256 MB RAM, 1 GB disk | Free | Trying the platform with a tiny tool, not WordPress |
| App Starter (per-app plan) | 1 vCPU, 1 GB RAM | $6, first period $3 | One WordPress site, nothing else |
| Package 1GB | 1 vCPU, 1 GB RAM, 15 GB disk | $6, first period $3 | A blog or brochure site, with room to add a small service later |
| Package 2GB | 2 vCPU, 2 GB RAM, 30 GB disk | $11, first period $5.50 | WooCommerce, page builders, or WordPress plus other apps |
The difference between App Starter and Package 1GB is how resources are shared. A per-app plan gives one service its own allocation. A package is a pool: you can run as many services inside it as fit, so a 2 GB package can hold WordPress plus, say, an uptime monitor or a small Git app. Our post on choosing the right resource package goes deeper into how pools work. Yearly billing costs ten months' price, so you get two months free.
Step 1: Create your account and verify your email
Go to sign up and create an account. Ordering is unlocked once you confirm your email address, so open the confirmation email before you go any further. The getting started guide covers the account basics if you have never used the panel before.
Invoices are paid with crypto at checkout or from your TheCodexApps wallet, which you top up with crypto. With auto-renew on, renewals are paid from the wallet while it has enough balance.
Step 2: Choose a package or plan in the USA location
Decide between a per-app plan and a package using the table above. If this is a single blog, App Starter is the simplest mental model. If you think you will add anything else, buy Package 1GB or Package 2GB and deploy WordPress into it.
Choose the USA location. It is the only region we offer today, which suits audiences in the Americas and is workable elsewhere with a page caching plugin.
Step 3: Deploy WordPress with MySQL from the catalog
Open the WordPress with MySQL app page or browse the full apps catalog. From the panel's order page, pick WordPress (the variant bundled with MySQL), then choose the plan or the package you bought and the USA location.
If you deploy into a package, there is no extra invoice: the service draws from the package's CPU, RAM and disk pool, and the panel checks the remaining pool before it creates anything. If you order a per-app plan, you pay the invoice and setup starts automatically once the payment is confirmed.
Within a few minutes the service appears with a status and a URL. Behind the scenes the platform has:
- created the WordPress container and a MySQL container next to it,
- generated the database password and other credentials as environment variables,
- created persistent volumes for the database and for
wp-content, - assigned a free subdomain and requested a TLS certificate for it.
About the generated environment variables
One-click apps come with generated variables, such as the database password WordPress uses to reach MySQL. Values are write-only, and changing generated ones can break the app. One-click apps pick up variable changes after a restart; see the environment variables docs.
Step 4: Run the WordPress installer and secure wp-admin
Open the service URL. Because the template already wires up the database connection, you normally go straight to WordPress's familiar installer instead of a database form. Choose your language, then fill in:
- Site title — you can change it later under Settings → General.
- Username — do not use
admin. Pick something that is not your public display name. - Password — use the strong one WordPress suggests or one from your password manager. This account can install code on your server.
- Email — a real address you read. Password resets and security notices go here.
- Search engine visibility — tick "discourage search engines" while you are still building the site, and untick it before launch.
Do this right after the deploy finishes: until the installer is complete, anyone who finds the URL could complete it instead.
Set permalinks first
Log in at /wp-admin and go to Settings → Permalinks. Choose "Post name" before you publish anything: changing structure later means redirects, changing it on day one costs nothing.
Step 5: Confirm HTTPS on your free subdomain
Your site is already reachable on a free subdomain under us.thecodexapps.xyz, served over HTTPS with a certificate from Let's Encrypt. Let's Encrypt does not charge for certificates, and its default certificates are valid for 90 days, which is why renewal must be automatic. On TheCodexApps it is: certificates are issued and renewed for you, with nothing to install and no cron job to remember.
Open the URL with https:// and check the padlock. WordPress has stored the subdomain as its site address, which is fine until you switch to your own domain.
Step 6: Attach a custom domain with free SSL
Custom domains need a paid plan or package, which you already have if you followed the sizing advice. The full procedure is in the custom domains docs; here is the WordPress-flavoured version.
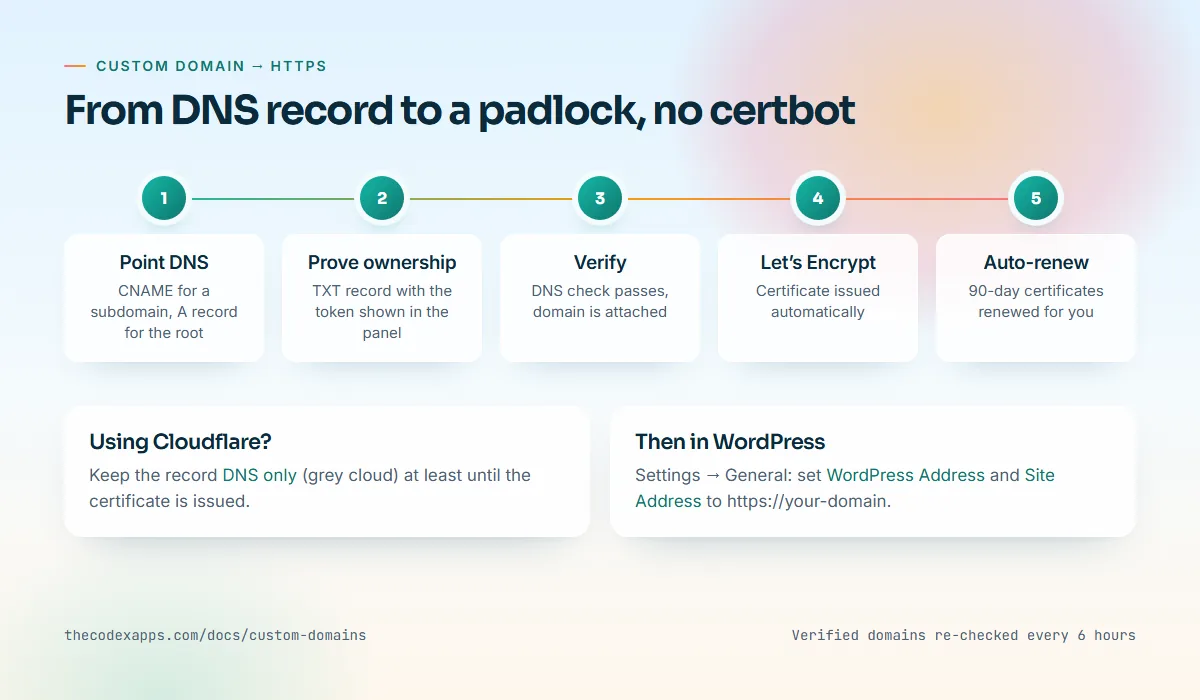
Open the service, go to Domains and add your custom domain. The panel shows you exactly which records to create. At your DNS provider, create two records:
- Point the domain at us. For a subdomain such as
blog.example.com, add a CNAME record pointing to your service's default subdomain. For a root domain such asexample.com, add an A record pointing to the server IP shown in the panel. - Prove you own it. Add the TXT record shown in the panel, with the verification token it gives you.
Then press Verify. DNS changes can take a few minutes to propagate. Once verification succeeds, the domain is attached and an HTTPS certificate is issued automatically.
Checking DNS and the certificate from your terminal
Optional, but a quick way to see what the world sees (replace the example hostnames):
dig +short CNAME blog.example.com
your-service.us.thecodexapps.xyz.
curl -s -o /dev/null -w "%{http_code} %{ssl_verify_result}\n" https://blog.example.com
200 0
echo | openssl s_client -connect blog.example.com:443 -servername blog.example.com 2>/dev/null | openssl x509 -noout -issuer
issuer=C = US, O = Let's Encrypt, CN = R11An ssl_verify_result of 0 means the certificate validated; the intermediate name in the issuer line varies.
If you use Cloudflare
Keep the record DNS only (grey cloud) at least until the certificate is issued; the proxy hides your server from the DNS check. If you enable the proxy later, use Cloudflare's "Full (strict)" SSL mode.
We re-check verified domains every 6 hours and email you if a domain stops pointing to your service.
Step 7: Switch WordPress to your HTTPS domain
WordPress stores its own address in the database, so attaching a domain at the platform level is only half the job. Log in to wp-admin on the subdomain, go to Settings → General and set both:
- WordPress Address (URL) to
https://blog.example.com - Site Address (URL) to
https://blog.example.com
Save, and you will be logged out and sent to the new address. Log in again there. Always use https:// in both fields; an http:// address here is the most common cause of mixed-content warnings and redirect loops.
Fixing mixed content and old links
Content built on the subdomain may still reference the old URL. A search-and-replace plugin that understands serialized data can rewrite the hostname; back up first (Step 8) and do a dry run.
If you lock yourself out
A typo in the address fields can make wp-admin unreachable. The official WordPress Docker image, which the one-click template is built on, adds the contents of a WORDPRESS_CONFIG_EXTRA environment variable to wp-config.php (see the image's documentation on Docker Hub), so you can temporarily define WP_HOME and WP_SITEURL there, restart, fix the settings, then remove the variable and restart again.
Step 8: Harden WordPress and set up backups
Most compromised WordPress sites fall to an outdated plugin, a reused password or an abandoned theme, not to core. A short checklist closes most of those doors.
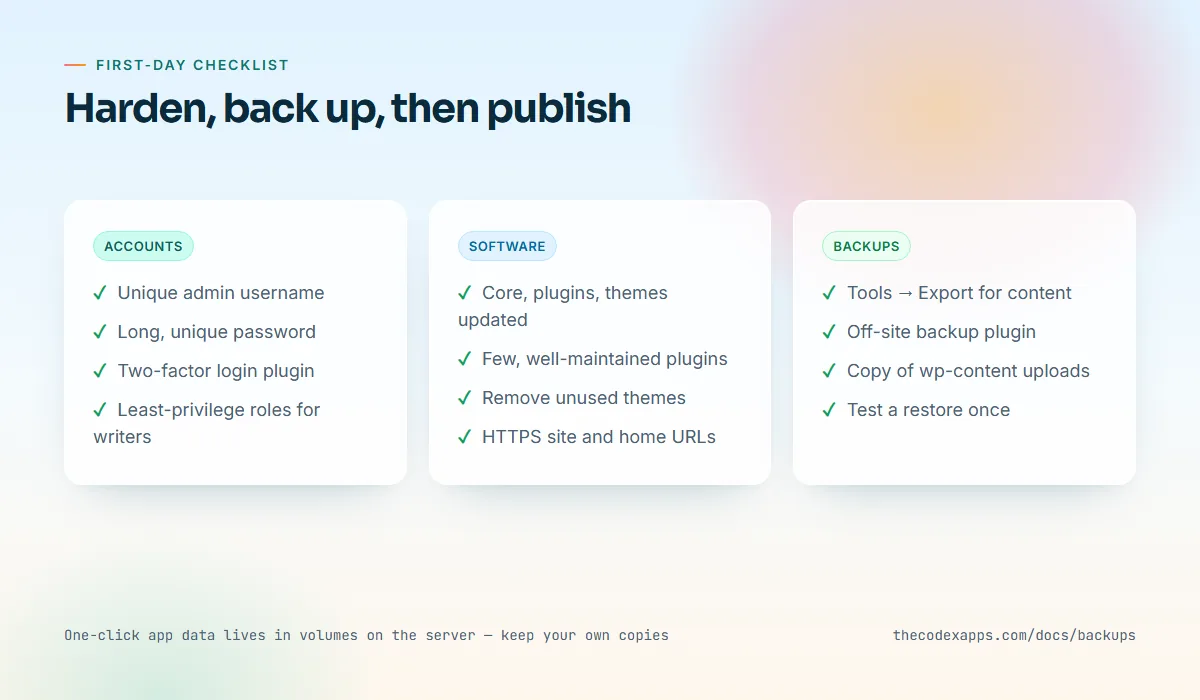
Accounts
- One administrator account for yourself, with a long, unique password.
- A reputable two-factor authentication plugin, enabled for every administrator.
- Author or Editor roles for writers, not Administrator.
- Remove accounts for people who no longer need access.
Software
- Keep core, plugins and themes updated; check the Updates screen weekly.
- Install as few plugins as you can, and prefer actively maintained ones. Every plugin runs with full access to your site.
- Delete unused themes and plugins instead of just deactivating them.
Backups: be clear about what is covered
TheCodexApps' backups cover managed databases on plans with backups: daily at 03:00 UTC, the last seven kept off-site. The one-click WordPress template is different: its bundled MySQL and wp-content live in volumes on the server, and the docs say to keep your own copies of anything important.
In practice, for WordPress that means:
- Content export. Tools → Export gives you an XML file of posts, pages and comments, but no settings, plugin data or media.
- A backup plugin with off-site storage. Export the database and
wp-contenton a schedule to storage you control, such as an S3-compatible bucket. - Before every big change. Take a manual backup before major updates, theme switches or search-and-replace runs.
- Test a restore once into a throwaway install. An untested backup is a hope, not a plan.
When a service is deleted, cancelled or unpaid, its data is deleted too; wallet auto-renew prevents an accidental lapse.
When to add RAM
WordPress tells you when it is short of memory, if you know where to look. Upgrade from 1 GB to 2 GB when you see any of these regularly:
- wp-admin takes several seconds to load even when nobody else is on the site;
- plugin or theme updates fail midway, or imports stop with a white screen;
- the service restarts under load, or the memory meter in the panel sits near the limit;
- you are adding a page builder, a multilingual plugin, membership features or a shop.
Upgrades are done in place from the panel. Before upgrading, check whether one heavy plugin is the real cause.
WooCommerce needs more headroom
Carts, checkout, order emails and payment integrations add database queries and PHP work, and checkout pages cannot be cached like blog posts. Start a shop on Package 2GB (2 vCPU, 2 GB RAM, 30 GB disk) or larger, keep plugins lean, and test checkout after every update. For any site, a page caching plugin is the biggest win on 1 GB; set it to bypass logged-in users and shop pages.
How this compares with other ways to run WordPress
Comparing platforms first? See the best Heroku alternatives for indie developers. If your focus is writing and newsletters, read self-hosting Ghost in one click. Building a headless front end in your own repo? Deploy from GitHub with automatic SSL.
Key takeaways
- WordPress.org recommends PHP 8.3+, MySQL 8.4+ or MariaDB 10.11+, and HTTPS. The one-click template gives you a containerised PHP stack with MySQL beside it and HTTPS handled by the platform.
- The free 256 MB app is great for tiny tools, but too tight for WordPress plus MySQL. Start on Package 1GB or App Starter ($3 for the first period, then $6 per month) and move to 2 GB for WooCommerce.
- Your subdomain gets a free Let's Encrypt certificate automatically. Custom domains need a CNAME or A record plus the TXT record shown in the panel; after Verify, SSL is issued and renewed for you.
- After attaching a domain, set both WordPress Address and Site Address to
https://in Settings → General. - Harden accounts and plugins on day one, and keep your own off-site backups: one-click app data lives in volumes on the server.
Frequently asked questions
Is the SSL certificate really free?
Yes. Certificates come from Let's Encrypt, which does not charge for them, and TheCodexApps issues and renews them automatically for your free subdomain and for any custom domain you verify. There is no certificate add-on or renewal fee on your invoice.
Can I run WordPress on the free tier?
We do not recommend it. The free app has 256 MB of RAM, and WordPress plus MySQL typically needs more than that to stay responsive, which is why the WordPress template's minimum plan is App Starter with 1 GB. The free tier also excludes custom domains. Use the free app to try a tiny tool, and start WordPress on Package 1GB or App Starter.
How long does it take before my custom domain has HTTPS?
Usually minutes. Once your DNS records are visible, Verify attaches the domain and the certificate is issued automatically. If it fails, check for slow DNS propagation, a typo in the TXT record, or a Cloudflare proxy switched on too early.
Do I need to renew the certificate myself?
No. Let's Encrypt certificates are valid for 90 days by default, and renewal is automatic on TheCodexApps. We also re-check verified domains every 6 hours and email you if a domain stops pointing at your service, so a DNS change does not silently break renewal.
Is my WordPress database backed up automatically?
The daily backups with one-click restore apply to managed databases on plans with backups. The one-click WordPress template keeps its bundled MySQL database and files in volumes on the server, so you should run your own backups: a WordPress backup plugin that copies the database and wp-content off-site, plus Tools → Export for content.
Can I migrate an existing WordPress site?
Yes. Deploy a fresh WordPress, then move the database and wp-content with a migration plugin, or import a dump and copy wp-content manually. Then update the site address and point DNS at the new service as in Step 6.
Which package should I pick for WooCommerce?
Start with Package 2GB (2 vCPU, 2 GB RAM, 30 GB disk). Stores run more database queries and cannot cache checkout pages, so they need more memory than a blog. Watch the memory meter after launch and move to Package 4GB if the store or your plugin list grows.
Try it
If you want to look around first, create an account and claim the free app with a tiny tool to see how deploys, logs and HTTPS subdomains work. When you are ready for WordPress, the launch sale takes 50% off the first period of every package and plan, so Package 1GB is $3 for your first month. Start from the WordPress with MySQL page, and check the pricing page for the full lineup.