Let AI Agents Deploy Your Apps (MCP Guide)
Connect Claude, Cursor or VS Code to TheCodexApps over MCP: API key or OAuth, scopes, spending caps and the Activity log, plus the full tool catalog and the safety model behind every deploy.
TheCodexApps Team
AI coding assistants are very good at writing code and surprisingly bad at shipping it. Ask one to "put this online" and it either hands you shell commands to run yourself or improvises against an API it half-remembers. The Model Context Protocol fixes that by giving the assistant a typed, documented set of tools it can call directly. This guide shows how to connect Claude Code, Claude Desktop, Cursor or VS Code to the TheCodexApps MCP server, what the assistant can do once connected, and how to set it up so a confused prompt can never spend money you did not intend to spend. Everything below follows our MCP documentation, which stays the source of truth.
- Create a key or use OAuth
- Add the server to your client
- Verify with a read-only prompt
- Grant more scopes deliberately
What MCP is, in one paragraph
The Model Context Protocol describes itself as "an open-source standard for connecting AI applications to external systems". An MCP server publishes a list of tools, each with a name, a description and a JSON schema for its arguments. An MCP client, such as Claude Code, Cursor or VS Code, reads that list, shows the tools to the model, and executes the calls the model decides to make. The protocol defines two standard transports: stdio, for servers that run as a local process, and Streamable HTTP, for servers that run remotely. Hosted services like ours use Streamable HTTP, which means there is nothing to install on your machine for clients that speak it natively.
Why a hosted MCP server beats writing your own
You could write a small MCP server that wraps a hosting provider's REST API, and for a personal script that works. For anything that touches money or production, a server run by the platform has three advantages.
First, the checks are the panel's checks. Our MCP tools call the same functions the TheCodexApps panel uses, with the same authorization, quotas, stock checks and billing rules. A deploy the panel would refuse, because a package pool is full or a template needs a larger plan, is refused over MCP with the same reason.
Second, the safety features live on the server. Previews, idempotency keys, spending caps and the audit trail are enforced in the platform's database, not in a prompt. A model cannot talk its way past a cap that is checked in the same transaction as the wallet debit.
Third, it keeps up with the product. When a tool is added or a rule changes, the hosted server changes with it.
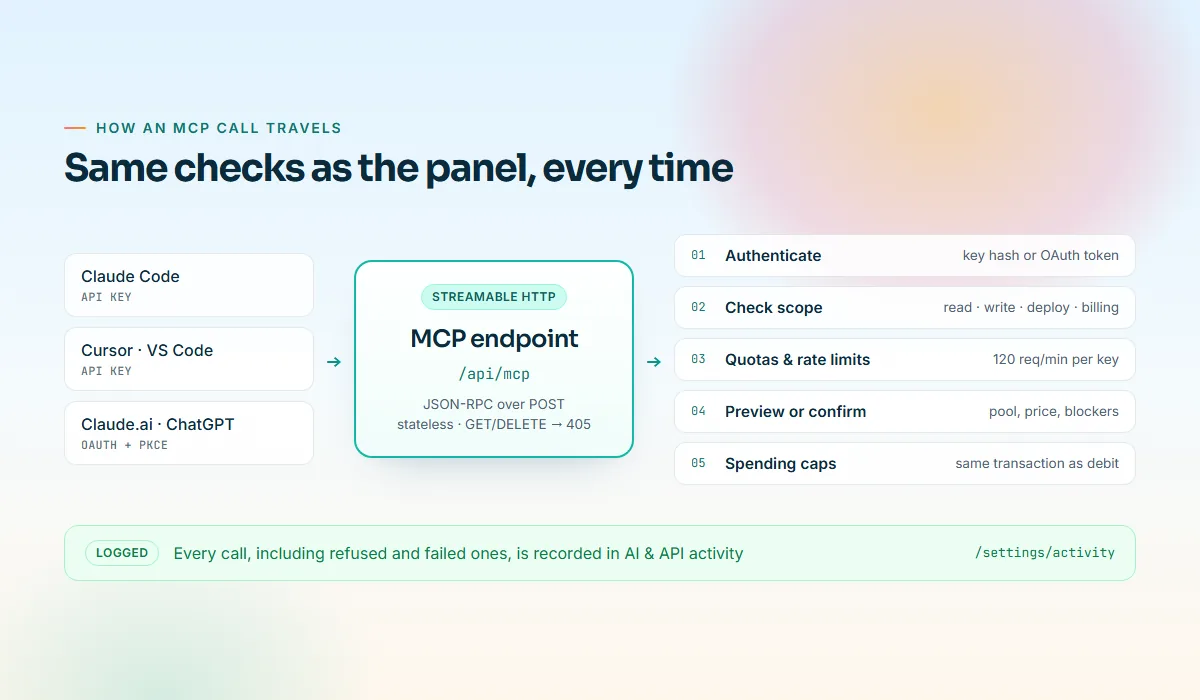
How the TheCodexApps MCP server works
The server lives at a single URL:
https://thecodexapps.com/api/mcp
It is a stateless Streamable HTTP endpoint: clients send JSON-RPC with POST (Accept application/json, text/event-stream), and GET and DELETE answer 405 because the server never opens a server-initiated stream. Your client handles all of that. There are two ways to authenticate:
| Method | Best for | How it works |
|---|---|---|
| API key | Claude Code, Cursor, VS Code, Windsurf, scripts | A bearer token ws_live_… created under Settings → API & MCP, sent as Authorization: Bearer ws_live_… |
| OAuth | Claude.ai, ChatGPT connectors, desktop connector UIs | Paste the server URL; the client discovers our authorization server, you sign in and approve scopes |
With OAuth, the client discovers our authorization server from RFC 9728 and RFC 8414 metadata, you sign in and approve, and the client exchanges a one-time code with PKCE (S256) for short-lived access tokens that it refreshes on its own. Either way, every tool checks the credential's scopes:
| Scope | What it allows |
|---|---|
read |
List and inspect everything. Always included. |
write |
Environment variables (set and delete), power actions, redeploys, custom domains (add and verify), delete with confirmation. |
deploy |
Create new services, apps and databases: free inside a package, or a plan order with an invoice. |
billing |
Pay orders and open invoices from your wallet balance, and create top-up payment links. |
The split matters. deploy lets an assistant create things, but without billing it can never pay for them from your wallet: a plan order is left as an unpaid invoice with a payment link for you to open.
Step 1: Create an API key or choose OAuth
For a first session, create a key with only read. Adding scopes later takes a minute, and you see how your assistant behaves with real data before it can change anything.
To create a key, open Settings → API & MCP, give it a recognisable name such as "cursor-laptop", tick the scopes and create it. The full ws_live_… value is shown exactly once (we store only its SHA-256 hash), so copy it straight into your client or a password manager. The settings page also shows ready-made snippets for each client with the new key filled in.
With Claude.ai, ChatGPT or a desktop connector UI, skip the key: you approve scopes on our consent screen in the next step, where read is always included, write and deploy are pre-checked when requested, and billing stays off unless you turn it on.
Step 2: Add the server to your client
Replace ws_live_YOUR_KEY with your key. These snippets come from the MCP docs; if anything differs, the docs win.
Claude Code
One command registers the server; the second confirms it is listed:
claude mcp add --transport http thecodexapps https://thecodexapps.com/api/mcp --header "Authorization: Bearer ws_live_YOUR_KEY"
claude mcp listClaude Desktop
Add this to claude_desktop_config.json (it uses the mcp-remote bridge):
{
  "mcpServers": {
    "thecodexapps": {
      "command": "npx",
      "args": ["-y", "mcp-remote", "https://thecodexapps.com/api/mcp", "--header", "Authorization: Bearer ws_live_YOUR_KEY"]
    }
  }
}
Claude Desktop's built-in connectors can also add the URL directly with OAuth, no key needed.
Cursor
Add this to ~/.cursor/mcp.json, or use the one-click Add to Cursor button on the settings page:
{
  "mcpServers": {
    "thecodexapps": {
      "url": "https://thecodexapps.com/api/mcp",
      "headers": { "Authorization": "Bearer ws_live_YOUR_KEY" }
    }
  }
}
VS Code
Add this to .vscode/mcp.json (note the servers key and explicit type):
{
  "servers": {
    "thecodexapps": {
      "type": "http",
      "url": "https://thecodexapps.com/api/mcp",
      "headers": { "Authorization": "Bearer ws_live_YOUR_KEY" }
    }
  }
}
A workspace file lives in your repository, so if the repository is shared, add .vscode/mcp.json to .gitignore.
Claude.ai, ChatGPT and other connectors
Add a connector, paste https://thecodexapps.com/api/mcp, sign in and approve the scopes. No key needed.
Step 3: Verify the connection with a read-only prompt
Before asking for anything that changes state, ask questions. A few prompts that only need read:
- "Which TheCodexApps account am I connected to, and which scopes does this key have?" (the assistant calls
whoami) - "List my services with their status and URLs." (
list_services) - "Which locations and packages can I deploy into right now?" (
list_locations,list_plans_and_packages) - "Search the one-click catalog for a self-hosted analytics tool." (
list_templates) - "Show the last deploy logs of api." (
get_deploy_logs)
If the answers match the panel, the connection works. A 401 Unauthorized means the key is missing, malformed, revoked or expired. A message that the key "is missing the … scope" means the tool needs a scope you have not granted, which is exactly what you want at this stage.
Then open Settings → AI & API activity. Each call you just made is there: the time, the key or connected app, the tool, the target and the result. Glancing at this page regularly is the best habit you can build once an agent acts for you.
Step 4: Grant more scopes and set caps deliberately
Once you trust the setup, grant the scopes for the work you actually want done, and no more. For day-to-day development, read plus write covers most requests: setting DATABASE_URL and redeploying, restarting a container, adding and verifying a custom domain. Add deploy when you want the assistant to create services. Deploys into a resource package are free, but the server checks the remaining CPU, RAM and disk pool first, exactly like the panel.
Treat billing as a separate decision. If you enable it, set caps on the key or connected app under Settings → API & MCP:
| Cap | Window | Useful for |
|---|---|---|
| Monthly cap | UTC month | A budget for everything the assistant pays, for example $50 |
| Daily cap | UTC day | Stopping a runaway loop from draining a month's budget in an afternoon |
| Per-charge maximum | Each payment | Making sure a single order can never exceed a size you expect |
New billing keys suggest a $50.00 monthly cap, and the OAuth consent screen suggests the same for a connected app; change it, add the others, or clear it. Caps count only wallet payments made through that key or app, never payments you make in the panel, and they are enforced in the same database transaction as the debit, so a refused payment never touches your balance.
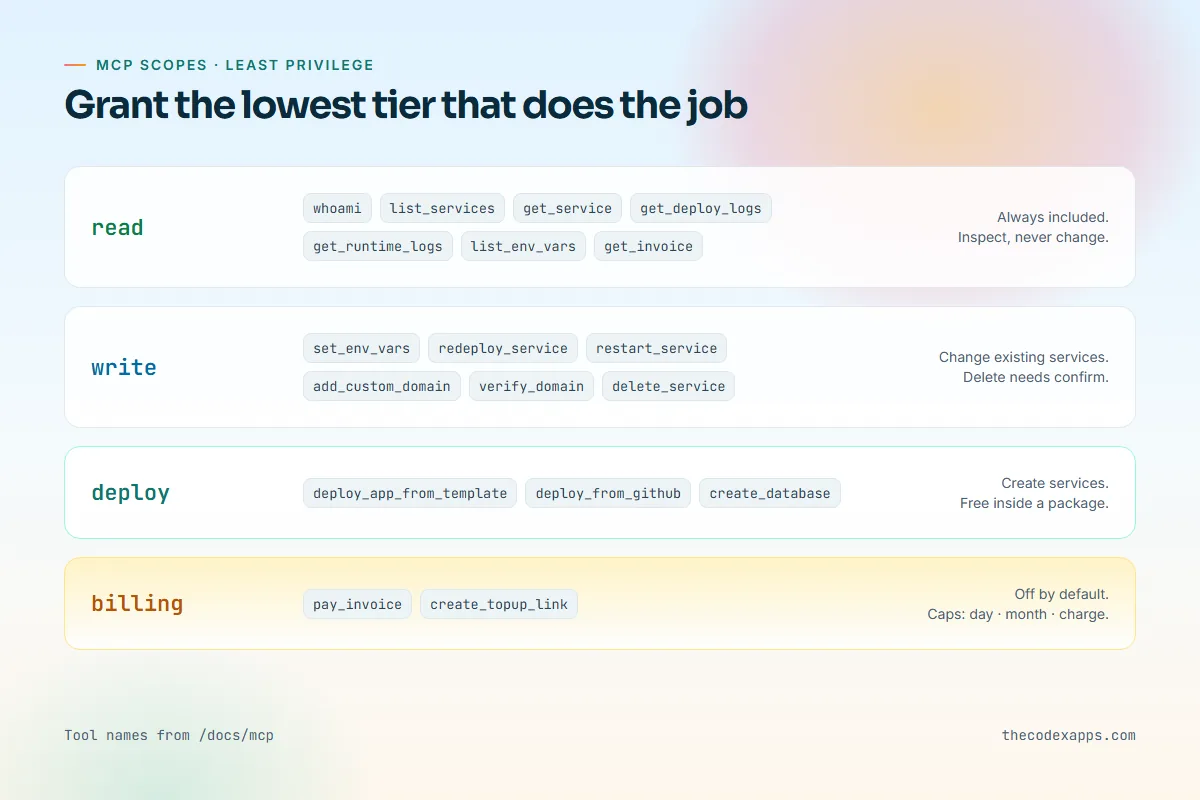
The tool catalog, grouped by scope
Tool names below are exactly as they appear in the docs, with a prompt that would typically trigger them.
Read: inspect without changing anything
whoami,list_locations,list_plans_and_packagesandlist_templatesdescribe your account and what you can order.list_servicesandget_serviceshow services, URLs, domains, variable names and recent deployments.get_deploy_logsandget_runtime_logsreturn build output and container logs, tailed to the last 20,000 characters.get_wallet_balance,list_invoicesandget_invoicecover what you owe and have paid.get_domain_statusandlist_env_varsreport domain verification and which variables are set (names withhas_value, never values).
Prompt: "The api service returned 502s an hour ago. Read the runtime logs and tell me what happened."
Write: change existing services
set_env_varsupserts up to 50 variables, all or nothing, with an optional redeploy.delete_env_varremoves one, but refuses platform-managedSERVICE_/COOLIFY_variables.redeploy_service,restart_service,stop_serviceandstart_servicehandle the lifecycle.add_custom_domainclaims a domain and returns the DNS records to create;verify_domainre-runs the DNS check.delete_servicedeletes permanently, but only withconfirm: trueand the exact service name inconfirm_name.
Prompt: "Why isn't shop.example.com working yet? Check the DNS and verify it."
Deploy: create new things
deploy_app_from_templatedeploys a one-click app into a package or on a plan.deploy_from_githubdeploys a public repository, a GitHub App repository or a deploy-key repository. Our GitHub deploy guide covers what your app needs to build cleanly.create_databasecreates a managed PostgreSQL, MySQL, MariaDB, MongoDB, Redis or ClickHouse database.
Prompt: "Deploy my GitHub repo acme/web on branch main into my Starter package with 1 GB RAM."
Billing: pay and top up
pay_invoicepays an open order, renewal or upgrade invoice from the wallet.create_topup_linkcreates a $5–$5,000 top-up invoice and returns a payment link for you to open. It charges nothing by itself and never charges a saved card.
Prompt: "My balance is too low; give me a $25 top-up link."
The safety model: preview, confirm, retry safely
What if a model misunderstands and orders the wrong thing, or retries a timed-out call and orders twice? The server answers both with mechanics, not trust.
Preview before spend. The create tools, pay_invoice and delete_service change nothing without confirm: true. Without it they return a preview: price, billing cycle, coupon, wallet balance and whether the allocation fits your package pool, plus can_place_order and a list of blockers. The preview runs the same checks as the real order, so a preview that says yes is not refused on confirm. Tell your assistant to always show you the preview first.
Idempotent retries. With confirm: true, the assistant passes an idempotency_key of 8–100 characters. Repeating the call with the same key within 24 hours returns the first result with replayed: true instead of ordering twice. pay_invoice accepts a key too, and create_topup_link requires one.
Billing is gated separately. Even with confirm: true, an invoice is only paid from your wallet when the credential has billing; otherwise it stays unpaid for you. pay_invoice and create_topup_link need billing for every call, previews included.
Everything is logged. Every call, including refused and failed ones, appears in AI & API activity with the cost in USD when money was involved and a hint on how to undo successful changes.
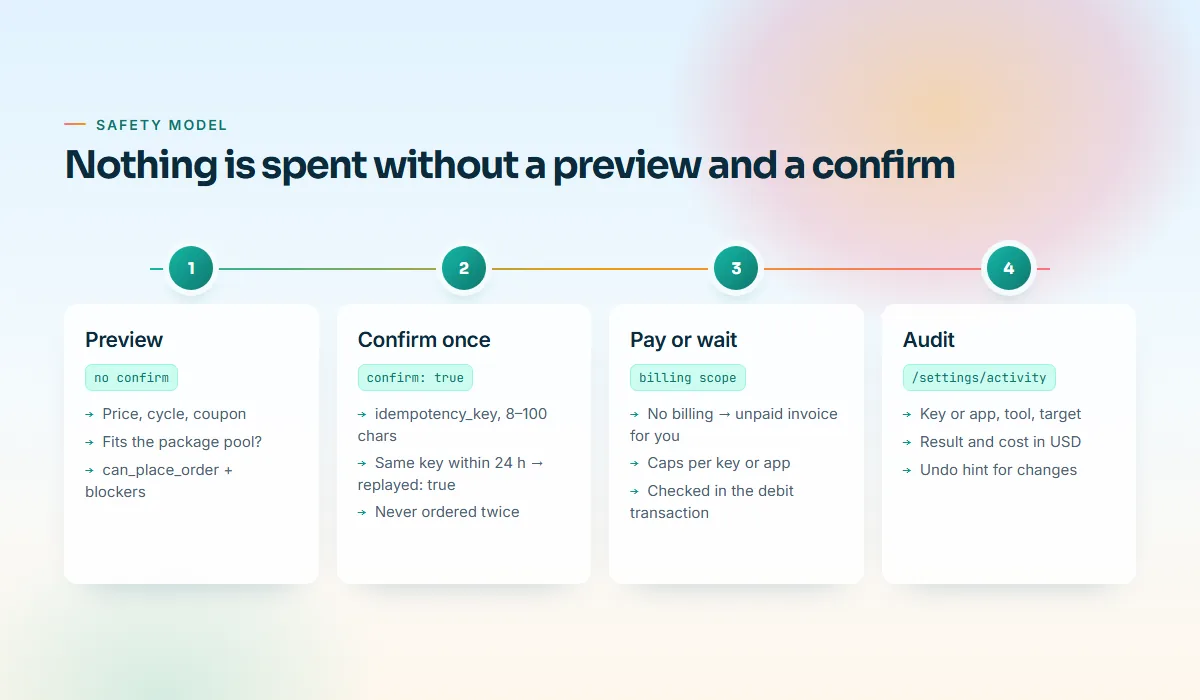
Security checklist for agent access
- Start read-only. Add scopes once you know what you want the assistant to do.
- One key per client and machine. You can revoke one without breaking the others, and the Activity log shows which one acted.
- Leave billing off unless you need it. Without it, the worst a confused deploy can do is create an unpaid invoice.
- Set all three caps if billing is on. Monthly sets the budget; daily and per-charge stop surprises inside it.
- Never paste keys into chats, issues or repositories. If a key leaks, revoke it under Settings → API & MCP and create a new one.
- Prefer OAuth where supported. Short-lived tokens beat a long-lived secret in a file, and you can disconnect apps under Settings → API & MCP → Connected apps. Changing your password or "Sign out everywhere" revokes every connected app at once.
- Review the Activity log. Anything you do not recognise is a reason to revoke first and investigate second.
Limitations worth knowing
Keys are personal. API keys and the MCP server act on the account of the person who created the key, not on a team account you were invited to, so a key you create as a developer on someone else's team works against your own account and wallet. Our team docs add that, inside a team account, granting billing, setting caps and opening AI & API activity need a role with billing access. For agent access to a shared account, the owner should create and hold the key.
Rate limits apply. 120 MCP requests per minute per key, plus the panel's own limits such as 10 redeploys per hour per service and 5 orders per hour per account. A good assistant waits on a "Too many …" message instead of looping.
Values stay on the server. No tool returns environment variable values; keep your own copy of secrets.
It is the same platform. MCP adds no regions or plans the panel lacks; today that means the USA location. For a broader comparison, see our Heroku alternatives guide.
Your assistant still makes mistakes. The server guarantees a call is authorised, previewed, deduplicated and logged, not that the assistant picked the right service. Read previews before you say yes.
A worked example: from repository to live URL in a chat
With a read, write and deploy key and a package with free capacity, you ask: "Deploy acme/web from main into my package." The assistant calls list_plans_and_packages, then deploy_from_github without confirm and shows you the preview. You say "go ahead"; it repeats the call with confirm: true and an idempotency key. If the build fails because the app listens on localhost instead of 0.0.0.0, get_deploy_logs shows why, you fix it, and it calls redeploy_service. Then add_custom_domain gives you DNS records for app.example.com, and once they exist verify_domain attaches the domain and HTTPS follows automatically. The same flow works from the browser with the Deploy button and the GitHub docs.
Key takeaways
- Our MCP server lives at
https://thecodexapps.com/api/mcpover Streamable HTTP. Use an API key for Claude Code, Cursor and VS Code, and OAuth for connector UIs. - Scopes stack:
readis always on,writechanges services,deploycreates them,billingpays from your wallet. Start read-only. - Orders and deletes need
confirm: true; idempotency keys make retries safe; spending caps are enforced in the same transaction as the payment. - Every call is logged at Settings → AI & API activity. Check it.
- Keys act on the creator's own account, not on team accounts.
Frequently asked questions
Do I need to install anything to use the TheCodexApps MCP server?
Not for clients that support remote HTTP servers natively, such as Claude Code, Cursor, VS Code and Claude.ai. The Claude Desktop config example uses npx mcp-remote as a bridge; its built-in connectors can add the URL with OAuth instead.
Should I use an API key or OAuth?
Use OAuth when your client offers it: no long-lived secret, and you can disconnect the app in one click. Use an API key for clients configured by file or command, and for scripts. Both go through the same tools and checks.
Can an AI agent spend money from my wallet?
Only if you grant the billing scope. Without it, an assistant can at most create an unpaid invoice that waits for you. With it, payments still require confirm: true, and per-key or per-app daily, monthly and per-charge caps refuse anything over your limits before the wallet is touched.
Can the assistant read my environment variable values?
No. list_env_vars and get_service return variable names and whether each one has a value, never the value itself. The assistant can set or delete variables with the write scope, but it cannot read secrets back.
What happens if my assistant retries a deploy after a timeout?
If it passed the same idempotency_key with confirm: true, the server returns the original result with replayed: true instead of creating a second order, for 24 hours. That is why the docs recommend always sending a key with confirmed orders.
Does the MCP server work with team accounts?
Keys act on the account of the person who created them, not on team accounts, so the owner of a shared account should create its key.
Is there a free way to try this?
Yes. Create an account at /signup, verify your email and connect a read-only key: reading your account costs nothing. The free tier includes one small one-click app on a free subdomain, and paid packages start at $3 for the first month during the launch sale.
Try it with your own assistant
Create a free account, connect your client with a read-only key, and ask it to describe your setup. When you are ready to deploy, the free one-click app covers tiny tools, and packages start at $3 for the first month during the launch sale, with as many services as fit in the pool. The full reference is in the MCP docs; the REST API docs cover the same keys for scripts and CI. If WordPress is your first target, start with our WordPress guide.